Saturday, June 25, 2011

2.5 Knitted Ruching

I associate "ruching" with a trim of gathered ruffles or pleats. Here the term seems to be used simply as an alternative for "edging."

The 4-row repeat produces a medium-wide garter stitch border with two rows of ladder eyelets running horizontally along the top and two staggered rows of large eyelets in the saw-tooth lower edge. Four stitches are adding in the first row and are maintained in the stitch count until they are bound off in the last row.


You can download the full-size chart, verbal instructions and notes here.

Up next: I have absolutely no idea. Making sense of this Victorian knitter's patterns is proving to be considerably more frustrating than those of the previous one. My apologies for the long delays in between posts.

Friday, May 6, 2011

2.4 Star Stitch for a Shawl


I am downright baffled by the name of this pattern. Polka Dot Lace, yes. Checkerboard Lace, sure. Even Windowpane Plaid. But Star? I just don't see it.


Unsuitable nomenclature aside, this stockingnet lace design produces a triangular fabric suitable for shawls. (I can also see it used as a kerchief or as an insertion for a neckline, creating a spot of openwork over the upper breastbone.) The simple pattern is easy to memorize and might be a good first project for the lace novice. After casting on three stitches and working two rows to get started, the 4-row repeat begins. Every right side row starts with a yarn over that is not worked off with a corresponding decrease and every other RS row ends similarly, resulting in the growth and shaping of the piece. The "star stitch" decrease, symbolized on the chart by an asterisk, reduces every three stitches to two and does not produce a bias fabric like o, k2tog.


My doll-size sample was knit with fingering weight wool on 3.75mm needles. I worked 60 rows and the piece blocked to 11¾" wide, 6" long.

You can download the full-size chart, verbal instructions and notes here.

Bonus Pattern for Crocheters

On the page opposite "Star Stitch for a Shawl" is "Star Stitch. Croched [sic]." It is the lone crochet pattern in the notebook. I am not much of a crocheter and I have not proofed the pattern, so I present it here verbatim and without illustration. (If any crocheters out there try it out, we would love to see your results. You can share photos of your work on the flickr 1884 Knitted Lace Sample Book group page.)

A chain of 20 stitches. Without putting the thread over first put the needle into the 2nd chain, thread over, and draw through leaving the two loops on the needle. Do the same in the next 3 chains successively drawing the wool up longer. Having 5 loops on the needle put wool over and draw through all, make 1 chain to hold it.
* Put needle into stitch where 5 loops are, draw thread through, put needle into back part of last loop of the star before. Draw through, put needle into the next two chain, just the same, drawing them up longer and thread over, draw through all 5 loops, and make one chain.*
Repeat between stars.

Next time: Knitted Ruching

Friday, March 18, 2011

2.3 Knitted Skirt


Like our Victorian knitter's mitten pattern, Knitted Skirt is not sufficiently coherent to derive step-by-step instructions for a complete project. The entry, however, has a number of interesting elements which make it worth sharing "as is."

Unlike most knitting patterns of the era, Knitted Skirt begins with notes on materials, calling for 2oz. Germantown wool in red for the lower border and 5-6oz. in grey or white for the body of the skirt. The writer recommends the fiber be prepared prior to knitting by pouring boiling water over it, wringing and hanging to dry. Presumably this is to felt the yarn somewhat and lessen the chance of the skirt stretching out with wear. Although no gauge is given, the needles should be "a little smaller than a pen holder." (Don't you just love it!)

The skirt is worked in two pieces, front and back, and then seamed at the sides. Both pieces begin at the lower edge with a simple lace border. The front is shaped near the top with a series of decreases; the back is knit as a plain rectangle.

154 stitches are cast on for the skirt front, 150 for the border pattern (15 repeats of the 10-stitch lace) and 2 stitches worked in what might be called reverse garter stitch (purl on both the right and wrong sides) along each selvedge to be taken up in the side seams. For my swatch I cast on 44 stitches. As the border developed, I had this nagging feeling I'd seen the pattern before, but where...?


Then it struck me-- the design bore a remarkable resemblance to 8. Wristlets. In fact, an examination of the stitch pattern reveals that it is actually a mirror image of the same motif. (The charts below show only the 10-stitch lace repeat without edge stitches.)


Although the two patterns use different decreases (P3tog for the skirt border, Sl1 K2tog psso for the wristlets), it is the placement of the decrease at the beginning or end of the sequence that determines the slant of the fabric. As illustrated below, even when the other decrease is substituted, the bias remains the same.

In charts for color or texture designs, stitches are arranged above the analogous stitches of the row below. Not so in the conventions of knitted lace charting and this can make it difficult to visualize the relationship between stitches in different rows. But when working the samples, the significance of the decrease placement becomes clear. When each right side row ends with the decrease (Knitted Skirt border), the o K1 o section is worked into the stitch formed by the the first yarn over of the previous right side row. However, when the decrease is first (Wristlets), o K1 o is shifted to the second yarn over. In other words, the former continually adds new stitches on the right and the latter adds them on the left, resulting in their respective slants.

Once the border is "as deep as you like," the main color yarn is picked up to work the body of the skirt. And this is where everything becomes muddled. I continued my swatch, but I have little-- really, no-- confidence that it resembles what was intended.


Here is the skirt body pattern verbatim [Note: "seam" was a common Victorian term for "purl"]:

Knit 8 plain, seam 8 so on making a plaid of 6 rows of
blocks, 8 rows make a square. Then seam 3 and knit 3.

My first problem with these instructions is the stitch count. Initially I interpreted this section to mean one would work a series of blocks, 8 stitches by 8 rows each, alternating knit and purl squares. After the first tier of squares, i.e., at row 9, one would switch to P3, K3. This is how I worked my swatch. But the 150 pattern stitches do not divide evenly into 16-stitch segments. If the pattern is reinterpreted to mean *K8, P8* to the last 6 sts, P3, K3, the stitch count comes out even. (K8, P8)6X, (P3, K3)9X also works. However, neither alone would produce a plaid, only thick and thin stripes. If there are to be squares 8 rows high, there must be some other pattern starting at row 9 in order to delineate the top of the squares, but what? If row 9 begins P8, K8, the outcome would be a checkerboard-- again, not a plaid. A horizontal stripe of stockingnet, garter stitch or reverse stockingnet in between each tier of squares might suggest a plaid, but the pattern says nothing about this. And what about that word "plaid" anyway? Is the skirt body a monochromatic texture or worked with both colors of yarn? After the last right side row of the border, did she purl back with the main color to avoid that white dotted line below the purled squares? So many questions, so few answers.

"After the plaids," the top of the front is shaped by working a series of decreases on right side rows "making gores." There is no mention of which decrease(s) to use, how many to work or how to space them across the front. For my swatch I chose 3 evenly spaced, balanced (vertical) double decreases (Sl2, K1, psso), resulting in a precipitous narrowing-- again, probably not what was intended.

The back of the skirt is to be knit the same as the front, omitting the shaping at the top.

Next time: Star Stitch for a Shawl, plus a surprise bonus pattern!

Tuesday, March 1, 2011

2.2 Lace for Either Thread or Yarn

A simple saw-tooth lace with a row of faggoting along the upper edge is given a bold look by the line of large eyelets cascading down to each point. Double yarn overs increase the stitch count by two in the first three right side rows and another stitch in row seven before the added stitches are bound off in the final row of the 8-row repeat.


You can download the full-size chart, verbal instructions and notes here.

Next time: Knitted Skirt

Friday, February 18, 2011

2.1 Lace

Astute readers will note that this is not in fact the mittens promised as the first pattern from our second knitting notebook. When I sat down to transcribe the "Directions for a Mitten," I discovered they were very sketchy, the kind of idiosyncratic notes one makes for oneself when the question of anyone else being able to follow them is not a concern. After limited headway in making sense of them, I have decided to move ahead with the other patterns and return to the mittens at some future date.

Our new first pattern is a medium-wide garter stitch edging titled simply "Lace." The upper panel is graced with diagonal rows of eyelets and bordered above and below by faggoting, while the lower edge features a curved leaf motif. Double yarn overs add two stitches to the original 20 every right-side row until a stitch count of 28 is reached, and the added stitches are bound off in the final row of the 10-row repeat.


You can download the full-size chart, verbal instructions and notes here.

Next: Lace for Either Thread or Yarn

Sunday, November 21, 2010

An Invitation

Several readers have mentioned incorporating the Victorian knitted lace patterns from this blog in their own projects-- selecting one of the sample book's edgings to border a shawl, for example. I think it might be fun to have a venue for sharing photos of these creations. With that in mind, I have set up an 1884 Knitted Lace Sample Book group on flickr.

All are invited to join and post photos. Since several patterns share names or were presented as "Untitled Edging," tag your photos with both the name of the pattern and the corresponding number from its blog post to facilitate visitors searching the group photo pool. Please limit contributions to photos of items that use the knitted lace designs from the sample book.

I can't wait to see your needlework!

* * * * * * *

A Regretful Acknowledgment
The holidays, general busyness and the quirky way our next anonymous knitter has made notes to herself will delay the launch of patterns from the second Victorian knitting notebook until the new year.

Monday, August 30, 2010

Son of The Project

When I announced two years ago that I had set up this blog to share my 1884 knitted lace sample book project with knitters around the world, my brother-in-law had just one question: What are you going to do with the blog after the mission is complete? At the time I didn't have any idea. Abandon it in cyperspace as a finished work? Chronicle other knitting projects? Take it in a whole different direction? It wasn't long before the answer presented itself. One day while searching for something else among my textile arts books, I stumbled on the perfect thing. It had been right under my nose, and I had completely forgotten about its existence. But there it was on my shelf: another late Victorian knitter's pattern notebook!

The slim volume is bound in tawny brown leather and filled with gilt-edged, lined paper. The flyleaf and possibly a few pages are missing from the front, but by and large the pocket-size (3¾" X 5¾") notebook is in good condition, the pages showing very little signs of age.


There are no samples and no clippings. All of the patterns are copied out in the same hand, and a few include the source, usually a magazine. The dates of publication, where noted, range from 1878 to 1894.

The patterns are more varied than in the previous sample book. There is knitted lace, yes, but also mittens, baby socks, afghans, slippers, even a knitted skirt and an outfit for a boy doll!


A few pages here and there are filled with other notations. There are several grocery lists, but some are more intriguing. A list of money received and spent in early July 1884. Names and addresses, including a source for "indestructible heads for dolls." Also "3 yds - Mrs. Saunders" and similar notes. And then there's this:


Received from Miss B April 19th 3 skeins of yarn

1033 Bedford Avenue Brooklyn

Sent to Miss B one pair of socks and sample on April 23rd 1889

Might the owner of the notebook have made a living with her needlework?


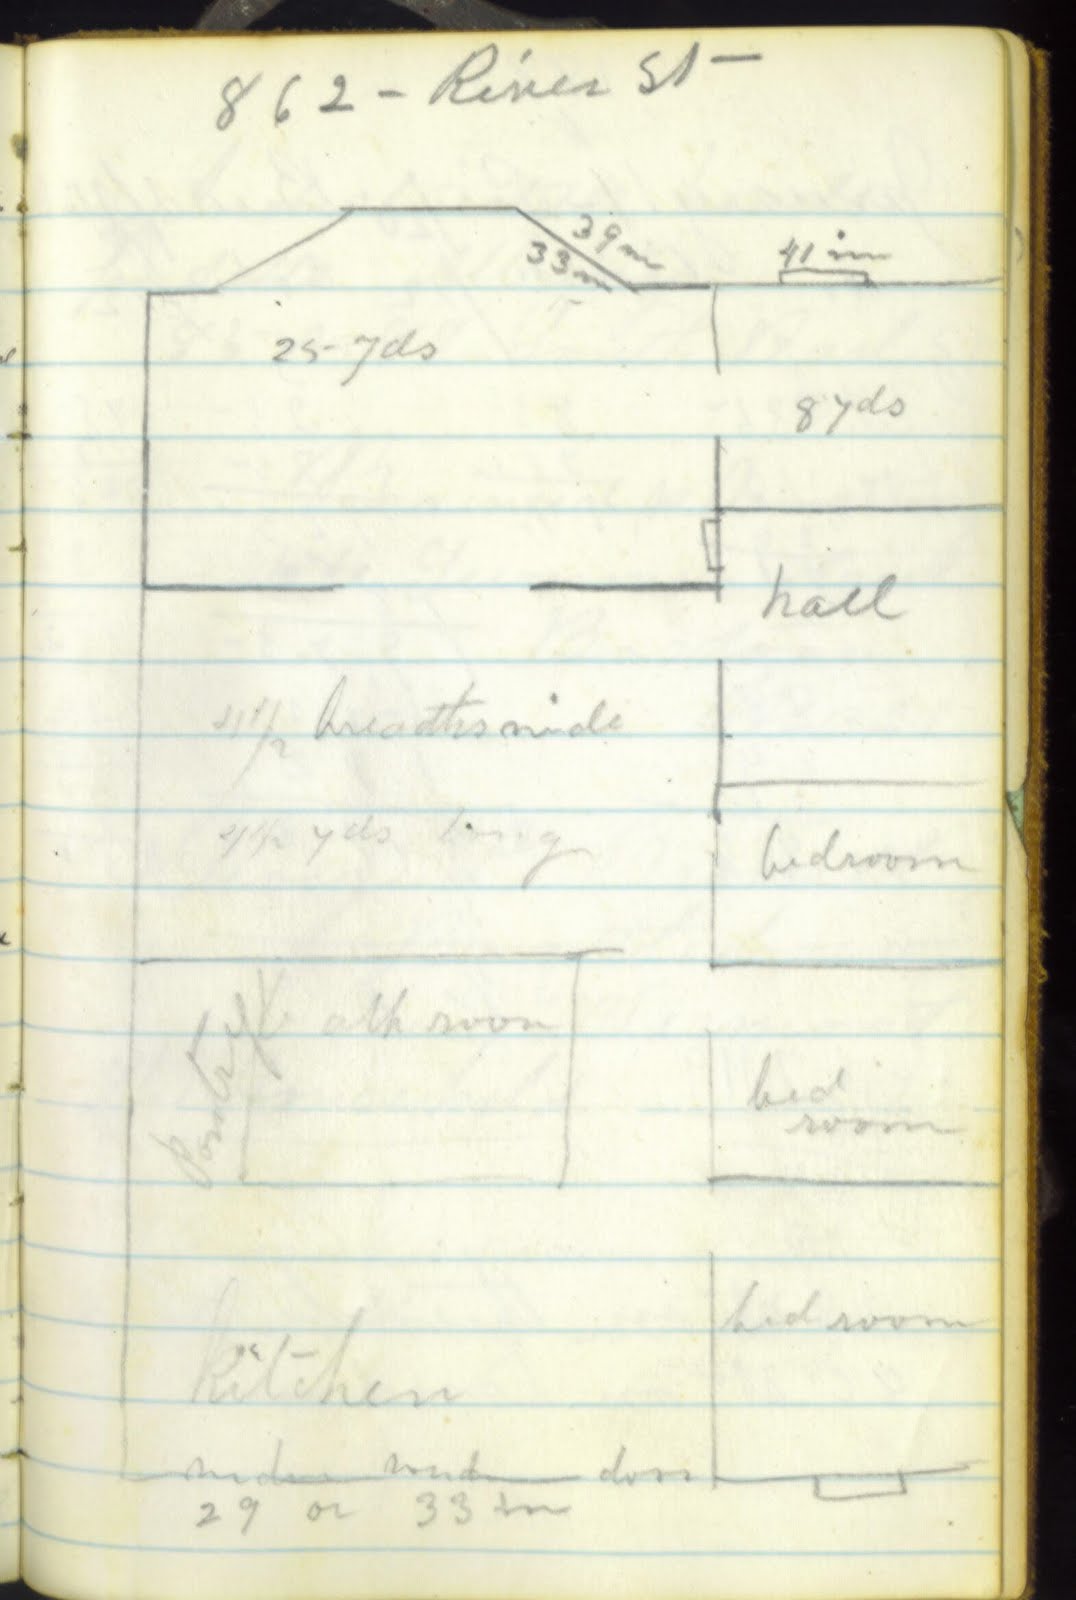
Most tantalizing of all is a page with a floor plan drawing of "862 River St."


Troy NY is mentioned several times in the notebook, including at the head of the received/spent list mentioned above, so that seemed like a good place to start the search for the house. Through the Wonders of Modern Technology (specifically Google Earth), much to my surprise and delight I was able to find the actual building still standing!


It cannot be proved, but I like to think of this as the home of our second anonymous knitter. Here she may have written in this very notebook by gas- or candlelight, and here she may have practiced her art.


And so I propose to embark on a new journey. Going forward I will share in this space the patterns she collected. I will continue to work my own samples of the lace patterns, but I expect many of the larger works such as the afghans will appear without illustration. The adventure continues!


Next time: Directions for a Mitten

Saturday, August 21, 2010

40. New Fancy Work

At the conclusion of my last post, way back at the beginning of the year, I teased that the final pattern in the 1884 knitted lace sample book would be "worth the wait." Little did I know just how long that wait would prove to be. As it turned out, life came between me and my knitting and I am just now getting back on track. Thanks to all who have hung in there.

Our grand finale pattern was published in the newspaper under the title "New Fancy Work" and was submitted by M.M. Niles of East Gloucester, Massachusetts. It appears first among the patterns in the sample book, but I have saved it for last because it is in a class by itself. In the accompanying notes the contributor suggests using it to make a tidy (for more on tidies, see 37. Vine Tidy), but my first thought upon seeing the instructions was "counterpane square." Worked from corner to opposite corner, the design features a raised leaf motif against a garter stitch ground in the lower half of the square and rows of eyelets alternating with reverse stockingnet stripes above.


The edges of the lower triangle of each square are rimmed with eyelets to use in sewing four squares together to form a block with the leaves at the center.


And when multiple blocks are sewn together, the full pattern is revealed: the eyelet rows come together as nested diamonds. A minimum of four blocks (16 squares) are needed to properly show off the arrangement. Since January I have managed to knit only a single block, so in the interest of expediting this post, the image below is actually a digitally created collage.


The rate the stitch count increases varies greatly-- the count rapidly rises in the first 15 rows, remains steady as the leaf motif tapers, and then increases again one stitch per row before reaching 38 at the center of the square. By contrast, the upper half of the square narrows one stitch per row throughout. The disparities make for a rather oddly shaped piece, but it is easily blocked into a uniform square. The 74 rows may seem excessive for what amounts to a little swatch, but since many rows are knit with just a handful of stitches, it is not as daunting as that number may suggest.

Only rarely do the sample book newspaper clippings include recommendations for materials, but Ms. Niles has several suggestions for her pattern. First and foremost: "In doing fancy work always use the best materials." She advises using very fine steel double pointed needles, No. 16 in the sizing system of her day, the equivalent of 1.25mm (US 0000) today. For thread she recommends either Morse & Kaley's four-ply No. 10 knitting cotton ("I can recommend this cotton highly. It is manufactured at Milford, N.H.") or Barbaric Drab Linen Thread No. 30. She continues

Sixteen of these pieces, or four squares ... makes a very pretty tidy, when bordered with some pretty edge. Line the tidy with some bright color.

For a coverlet, the fingering weight cotton and 2.25mm needles I used for my sample would be ideal. The individual squares blocked to 3½" along each side.

If used for a project today, some refinement of the pattern may be in order. Although paired decreases are used to taper the leaf, only K2tog is used to shape the upper half of the square where a left-leaning decrease might be preferred along one side. (And while we're at it, I think I would set the decreases in from the edge, slipping the edge stitch, for a smoother selvedge and easier sewing of the blocks together.) The tip of the leaf would also benefit from a change. As written, the leaf narrows by one stitch per side every other row until it is down to three. From there only one stitch is worked off on each of the next two right side rows. The resulting leaf tip lacks definition. The obvious substitution would be a single double decrease.

This pattern is so large it would be unintelligible without a powerful magnifying glass if the chart, verbal instructions, notes and photos were laid out on a single page as I have done in the past. So I have divided it up in two parts. You can download the chart here and everything else here.

Next week: But wait! There's more!

Friday, January 15, 2010

39. Sea Shell Lace

At the end of the last pattern I referred to this next post as "Loose Ends" because I anticipated presenting Sea Shell Lace as an incomplete pattern. I simply could not make heads nor tails of the final row. It begins with 11 stitches and needs to end up with 8 in order to be ready to start again at Row 1, and yet it appeared that far more than 3 stitches were bound off. The sample that had once accompanied the pattern provided no clues-- it was missing and all that was left was the line of glue where it had been attached.

When an internet search failed to turn up a corrected version of the pattern I debated whether to include it at all, but finally decided that someone reading this might recognize the design and share it with us. So I knit the repeat as far as I could, pinned out and photographed the little swatch, and prepared to write my post. In place of a chart I planned to use a scan of the original page of the sample book for illustration, and as I got the book ready to place on the scanner, my eyes fell on the last few words: pick over k6. Oops. I had been knitting from my transcription in which I omitted that all-important "k," making it seem that six stitches were passed over one to cup the fabric in the manner of 13. Shell Pattern. Small mistake, but what a difference. So it was back to knitting to finish the sample, and without further ado I offer for your consideration "Sea Shell Lace."


You can download the full-size chart, verbal instructions and notes here.

Next time: The Grand Finale (and it will be worth the wait!)

Friday, January 1, 2010

38. Untitled Edging

This is another pattern our Victorian knitter copied down in her sample book without including its name. Two rows of ladder eyelets run along the top. Slightly overlapping raised leaves, worked in stockingnet and offset by a narrow band of reverse stockingnet above and below the motifs, are laid end to end. The contour of the leaves tends to pull the eyelet rows into a soft curve, which can be enhanced or discouraged in the blocking process. Again with this pattern we see the tendency of 19th Century designers to use K2tog on both sides of a tapering motif, where a modern lace knitter would employ balanced decreases. The lower garter stitch portion of the design might make a good Rorschach test-- I see sideways Christmas trees and pawprints...

After a big jump in the first row due to the double yarn overs, the stitch count rises steadily as the leaf widens, from 22 to 33 by row 8. Some of the added stitches are bound off in rows 9 and 11, before more double yarn overs increase the count again. From row 16 on, the tapering of the leaf tip decreases the stitch count evenly, and the last few added stitches are cast off in the final row of the 20-row repeat, creating the smaller notch along the lower edge.


You can download the full-size chart, verbal instructions and notes here.

Next week: Loose Ends

Sunday, November 29, 2009

37. Vine Tidy

"Vine Tidy" is in a class by itself among the patterns of the sample book. Not only is it one of a mere handful of stockingnet designs, but it is the sole example of an all-over lace pattern. Rather than an edging or insertion intended as a component in a larger work, it produces a fabric that can be adapted for a wide variety of knitting projects where lace is desired. The ropy vine motifs alternate with trios of zigzagging lines to form a trellis effect. The pattern has a 12-row repeat and is worked on a multiple of 19 stitches for circular knitting, 19 + 12 for flat fabric.


You can download the full-size chart, verbal instructions and notes here.

Variations of the pattern can be found in many modern day texts. Knitting Counterpanes: Traditional Coverlet Patterns for Contemporary Knitters by Mary Walker Phillips, for example, includes "Braided Leaf Insert." While designed as a panel, the pattern is essentially the same as Vine Tidy (more about that "tidy" in a moment), the only difference being that the two vines at the center of the insertion, while flanked by trellises on the right and left, are separated from one another by a single eyelet.

(photo ©1989 The Taunton Press)

Note the scalloped cast-on edge. Worked without a border, the Vine Tidy pattern also has this feature.

I have charted the pattern as it would appear in a knitting stitch dictionary, but the instructions in the sample book were written to create a specific household article, the tidy. In some Victorian sources, the tidy is a receptacle of some kind-- a box to set in the bathroom and hold toiletries, a bag to hang from a doorknob and organize mail. Here, however, the tidy is a square or rectangular doily (antimacassar, dresser scarf, placemat, etc.) knit back and forth rather than from the center.


Worked across 89 stitches and featuring three repeats of the vine pattern, the tidy includes a stockingnet border, a curious selection given the tendency for the ends to curl up and the selvedges to curl under, as evidenced in the photo. A border of garter or seed stitch would have been a better choice. My sample was knit in fingering weight cotton on 2.25mm needles. With 16 pattern repeats, the finished piece blocked to 11¼" X 17½".

In the sample book Vine Tidy was hand-written by our anonymous knitter with no attribution, but I couldn't help but notice that it is identical in every respect (same width, same border, same three vines, everything) to a pattern found in my favorite book in my knitted lace library, Fancy Work Recreations: A Complete Guide to Knitting, Crochet, and Home Adornment published in 1884 (there's that date again!) by Buckeye Publishing Co., Minneapolis, and written by Eva Marie Niles, shown below in the frontispiece.


Ms. Niles must have been a lace knitter first and foremost. Although the text covers a wide variety of needlework including crochet, patchwork, embroidery, drawn thread, macramé, darned lace and netting, not to mention crafts such as skeletonizing leaves, splatter pictures, leather work, brass repoussé and others, fully a third of the 433-page work is devoted to knitted designs, mostly lace. An explanatory note at the back of the book cites the Housekeeper, Peterson's Magazine and the New York Tribune as sources for some of the instructions, but adds that "a greater part of the knitting and crochet is original with the author."

In this period the technology of reproducing photographs in books and newspapers was advancing, although online sources disagree on the exact date the first of such illustrations appeared. Photographic images in publications may have made their debut a few years before or shortly after Fancy Work Recreations, but whatever the fact of the matter, the process surely must have remained prohibitively expensive for some years, and drawings and etchings continued to be the most common illustrations in needlework books and magazines. The image accompanying Ms. Niles' "Vine Tidy" pattern shows a detail of the design. The swatch is presented with the cast-on edge at the top, in contrast to current practice where stitch pattern photos reflect the conventions of charting, with row 1 at the bottom.


Although the drawings are usually notable for their accurate rendering of the smallest detail, note the inexplicable eyelet in each leaf lobe-- there is no yarn over in the pattern at that point.

Up next: Untitled Edging

Friday, October 16, 2009

36. Wheat-Ear Lace

"Wheat-Ear Lace" is a relatively narrow garter stitch edging, blocking to 7/8" when knit in fingering weight yarn on 2.25mm needles. It features pairs of eyelets tipped diagonally to create the motif. The lower edge is scalloped and rimmed with eyelets formed by beginning each wrong side row with a yarn over. The stitch count rises from five to eight over the first five rows, and the added stitches are worked off with the diabolical P5tog in the final row of the 8-row repeat.


You can download the full-size chart, verbal instructions and notes here.

Next time: Vine Tidy

Friday, October 9, 2009

35. Normandy Lace

"Normandy Lace" is from a newspaper clipping accompanied by this note:

Sisters of the Home: Here are directions for knitting Normandy lace. I know you will like it. Be sure to knit it loosely. It comes in points and wheels. The points are solid, but the wheels are open. - Julie Beers.

The garter stitch edging is a "true" knitted lace with every row a pattern row. The stitch count rises steadily in the first half of the pattern, but the added stitches are worked off in a less orderly fashion in the second half of the 12-row repeat.


You can download the full-size chart, verbal instructions and notes here.

Next time: Wheat-Ear Lace

Friday, October 2, 2009

34. French Lace

"French Lace" is a garter stitch edging featuring a spot design of eyelet clusters formed by short segments of faggoting. A single large eyelet adorns each "sawtooth" of the lower edge. The stitch count jumps by four in the second row and thereafter remains constant until the added stitches are bound off in the last row of the 8-row repeat.


You can download the full-size chart, verbal instructions and notes here.

Next week: Normandy Lace

Saturday, September 26, 2009

33. Second Pattern

Simple and sweet, "Second Pattern" (from a newspaper clipping, the name implies there having been another design published at the same time) is a narrow saw-tooth trim with diagonal rows of eyelets. The stitch count rises steadily from four to seven before the added stitches are bound off in the final row of the 6-row repeat.


You can download the full-size chart, verbal instructions and notes here.

Next week: French Lace

Friday, September 11, 2009

32. Knitted Lace Insertion

D.P.A. of Cassopolis MI submitted "Knitted Lace Insertion" to the newspaper to match a previously published edging. A trio of eyelets zigzags across the panel and back again. The yarn over/decrease pairs shift one stitch over each right side row. Here the change in direction is achieved solely by the position of the yarn over relative to its corresponding decrease, i.e., before or after the decrease, while a modern designer would most likely employ a different decrease as well. The garter stitch panel of 15 stitches has a 26-row repeat.


You can download the full-size chart, verbal instructions and notes here.

Next up: Second Pattern

Friday, September 4, 2009

31. Aunt Mary's Lace

"Aunt Mary's Lace" features a plain garter stitch upper edge, a lozenge-shaped motif and eyelets outlining the scalloped lower edge. The stitch count varies a great deal from row to row due to the placement of the yarn overs in relation to their corresponding decreases.


You can download the full-size chart, verbal instructions and notes here.

This is another pattern from a newspaper clipping, the design sent in by subscriber Mrs. J. L. I. She wrote:

My sister and I have knitted many pretty designs given and would now like to make some return to the fair knitters. I send herewith a specimen and directions for edge unlike anything I have yet seen. It is my sister's design and we call it 'Aunt Mary's Lace.'


Next up: Knitted Lace Insertion

Friday, August 28, 2009

30. Knife Pleated Edging

After an August hiatus (while I settled into a new job and tended to other matters), our parade of Victorian designs returns with the only non-lace pattern in the sample book. "Knife Pleated Edging" features a knit-and-purl texture and uses short rows to create the pleats.

Like 5. Knitted Trimming the sample had a tendency to curve as it was knit. Since the pleats had more rows than the upper edge, the lower area wanted to fan out before blocking.


However, unlike the earlier pattern, where blocking straight would have obscured the lace pattern, bringing the upper edge of this design in line enhanced the pleated effect. I blocked the same sample two ways. First, without stretching the fabric in either direction, I pinned the upper edge in a straight line and pinned the pleats in place directly below. This maximized the depth of the folds.


Then I reblocked the edging, gently stretching the width and height. This version highlighted the knit/purl surface design.


While most modern short row instructions call for "wrap and turn"--- i.e., at the end of the short row: 1) bring yarn forward, 2) slip the next stitch, 3) yarn back, 4) return slipped stitch to left needle before turning the work--- to prevent a gap in the knitting, the sample book makes no mention of the technique. I knit my swatch of the pattern as written, simply turning the work with three stitches unworked and proceeding to the next row. The resulting holes are fairly small and are noticeable only when the sample was blocked stretched out. In this case, they can serve as a design feature, offsetting the lower pleats from the narrow band along the upper edge.


You can download the full-size chart, verbal instructions and notes here.

Next week: Aunt Mary's Lace